People have been asking me questions on how I dye my wools so I decided to lay it all out for them here! You can also dye yarns this way. There are tons of great books on different dye methods and this one too.
Really important NOTE: DO NOT EVER use your dye equipment for cooking once you have used it for dyes...keep it separate from your cooking stuff! Wear a mask when handling powders, do NOT breathe them in. Wear rubber gloves while working with dyes. Keep all this away from children.
Step #1 - Go to a yard sale or a thrift store and find a crock pot!
Step #2 - Weigh out your wool (or yarn), I usually find that 8 oz fits nicely into ye ole crock pot. In case you are interested I used Falkland wool.
 Step #3 - Soak your wool in a bucket w/ room temperature water & 1/2-1 cup of white vinegar. Leave it in there for about an hour. Just forget about it and do your nails or weed the garden or something else.
 Step #4 - Choose your dye colors. Acid dyes ok? I buy mine from Dharma Trading, they have everything!! I like to use 3 colors when I make my color ways, it's arbitrary, I just like using 3's. You could use one color of dye if you like as well.
 Step #5 - Mix about a teaspoon of dye w/ some hot water in a container.
 Step #6- start to coil your yarn into the bottom of the crock pot, then squirt or pour or sprinkle some colors on the wool, and then make another layer...like a lasanga...but keep the colors in their own designated area. You know? So if you have red on the right side of the pot, blue in the center, and yellow on the left, keep repeating that pattern as you stack the roving, so the colors stay in their own area.
 see I've done, brown, orange, burgundy, orange, brown all the way up through all the layers of wool.
 Step #3 - Soak your wool in a bucket w/ room temperature water & 1/2-1 cup of white vinegar. Leave it in there for about an hour. Just forget about it and do your nails or weed the garden or something else.
 Step #4 - Choose your dye colors. Acid dyes ok? I buy mine from Dharma Trading, they have everything!! I like to use 3 colors when I make my color ways, it's arbitrary, I just like using 3's. You could use one color of dye if you like as well.
 Step #5 - Mix about a teaspoon of dye w/ some hot water in a container.
 Step #6- start to coil your yarn into the bottom of the crock pot, then squirt or pour or sprinkle some colors on the wool, and then make another layer...like a lasanga...but keep the colors in their own designated area. You know? So if you have red on the right side of the pot, blue in the center, and yellow on the left, keep repeating that pattern as you stack the roving, so the colors stay in their own area.
 see I've done, brown, orange, burgundy, orange, brown all the way up through all the layers of wool.
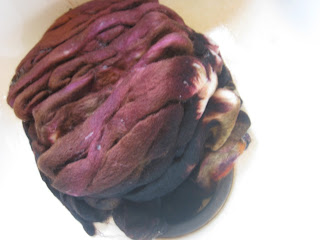
Step # 7 - Close the crock pot and turn on (mine only has low & high temps so I use high). Let it cook for about an hour. Then turn it off and let it come down to room temperature. I waited until the next day. On the sample I'm showing you here. My dye had totally exhausted so any liquid left in the pot was completely clear.
Step #8 - Dump it into the sink
 Step #9- Rinse the wool by making a reservoir in the corner of the sink. Use water that is the same temperature as the wool to avoid felting. Since the dye had exhausted there was very little color going down the drain.
 Step #10- Put the wool out to dry. And when it's dry you can spin it up!

 Step #9- Rinse the wool by making a reservoir in the corner of the sink. Use water that is the same temperature as the wool to avoid felting. Since the dye had exhausted there was very little color going down the drain.
 Step #10- Put the wool out to dry. And when it's dry you can spin it up!
.jpg)


